Thursday, December 9, 2021


Gondola With Scrap Steel Load Project

This is a Revell HO scale gondola I picked-up at the Whistle Stop in Pasadena for $3.00. Fred’s price point was just too alluring to ignore. This model dates to the mid-1950s so it’s just about as old as the six-transistor radio I still own, but that’s another story.

By the standards of the day this was a pretty good model when introduced, featuring a low center of gravity and free rolling sprung trucks with metal frames. All details were cast on the body. But for my purposes I replaced the sill steps with steps from A-Line and retired the trucks as the flanges of the plastic wheels were a bit too deep and the trucks had talgo-mounted couplers. My replacement trucks from Old Pullman had metal wheels.

I installed a Kadee-compatible coupler mounted in a Kadee coupler box. The coupler box was secured to the body with a screw.

I thought I needed a new brake wheel as I did not see one on the car. Upon closer inspection I discovered the car had a simulated lever brake wheel. These were found on prototype cars but I can’t think of any I have seen on the several hundred freight cars from many manufacturers on my roster. Something different yet still prototypical.

Now to the load. I cut up a large plastic drinking cup and the plastic tops of takeout food containers to make scrap steel for the load. The thin cross section of this plastic makes them idea as a starting point for prototype scrap. The pieces are supposed to represent steel sheet cut from storage tanks or ships. Truthfully, my pieces are a bit too large for this type of scrap going to a steel mill for recycling. The pieces probably should be no larger than four-feet by four feet, or thereabouts.

The pieces were painted with either red oxide or dark gray automobile primer paints. Some of these pieces received a second coat of Rust-Oleum Rustic Umber Multicolor Textured spray paint.

When dry each piece received a dusting of one of several PanPastel rust and earth toned weathering media. The objective was to differentiate the individual pieces so they did not all appear to be the same rusty color. The pieces with the textured paint took on the appearance of heavily rusted metal, further distinguishing the individual pieces.

I intended this to be a permanent load so the pieces were glued into place with Canopy Glue, one layer at a time. They received further dusting with various PanPastel media.

In terms of time and effort this was a simple load to construct. And I received some satisfaction from being able to use such an old model on my railroad.


Saturday, December 4, 2021


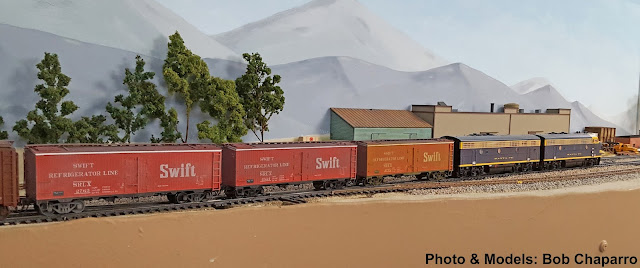
Swift Reefer Trio

Here is a trio of Rapido HO scale Swift meat reefers on my Citrus Belt Railway. They are some of the mainly empty freight cars being hauled from the Los Angeles area to San Bernardino, where they will be blocked and sent out on various trains headed to the Midwest and Southwest. On my railroad this local train is known as the “Bulldog”, the same name for a similar train once operated by the Santa Fe for a similar purpose.

Until I started the Railway Bull Shippers group ( https://groups.io/g/RailwayBullShippersGroup ) back in 2006 I had no meat reefers on my railroad. This railroad still concentrates on the citrus industry and produce reefers, but the roster of meat reefers grows a bit each year. I just don’t have any meat packers or meat packer branch houses on the railroad, so the cars only appear in moving trains.

The Rapido reefers are highly detailed and operate quite well. The trucks rolled so freely I didn’t bother lubricating the journal cavities with Teflon.

I used PanPastels to weather them. Compared to most prototype photos I have seen of the red Swift reefers these models are a bit more weathered on the sides. However, the prototype photos from the mid-1950s show a lot of soot on the roofs and wheels splash residue on the ends. My guess is that Swift regularly cleaned the sides of their cars but didn’t bother with the ends or roofs.


Thursday, December 2, 2021


Modeling Project: Second Cull Lemon Load In A Gondola

An article on prototype gondolas for transporting lemons was posted on the Railroad Citrus Industry Modeling Group in 2018:

https://tinyurl.com/3m7yr5p2

The article kindled my interest in building an HO scale gondola with a cull lemon load. I reported on this project last year:

https://tinyurl.com/bddpf3dx

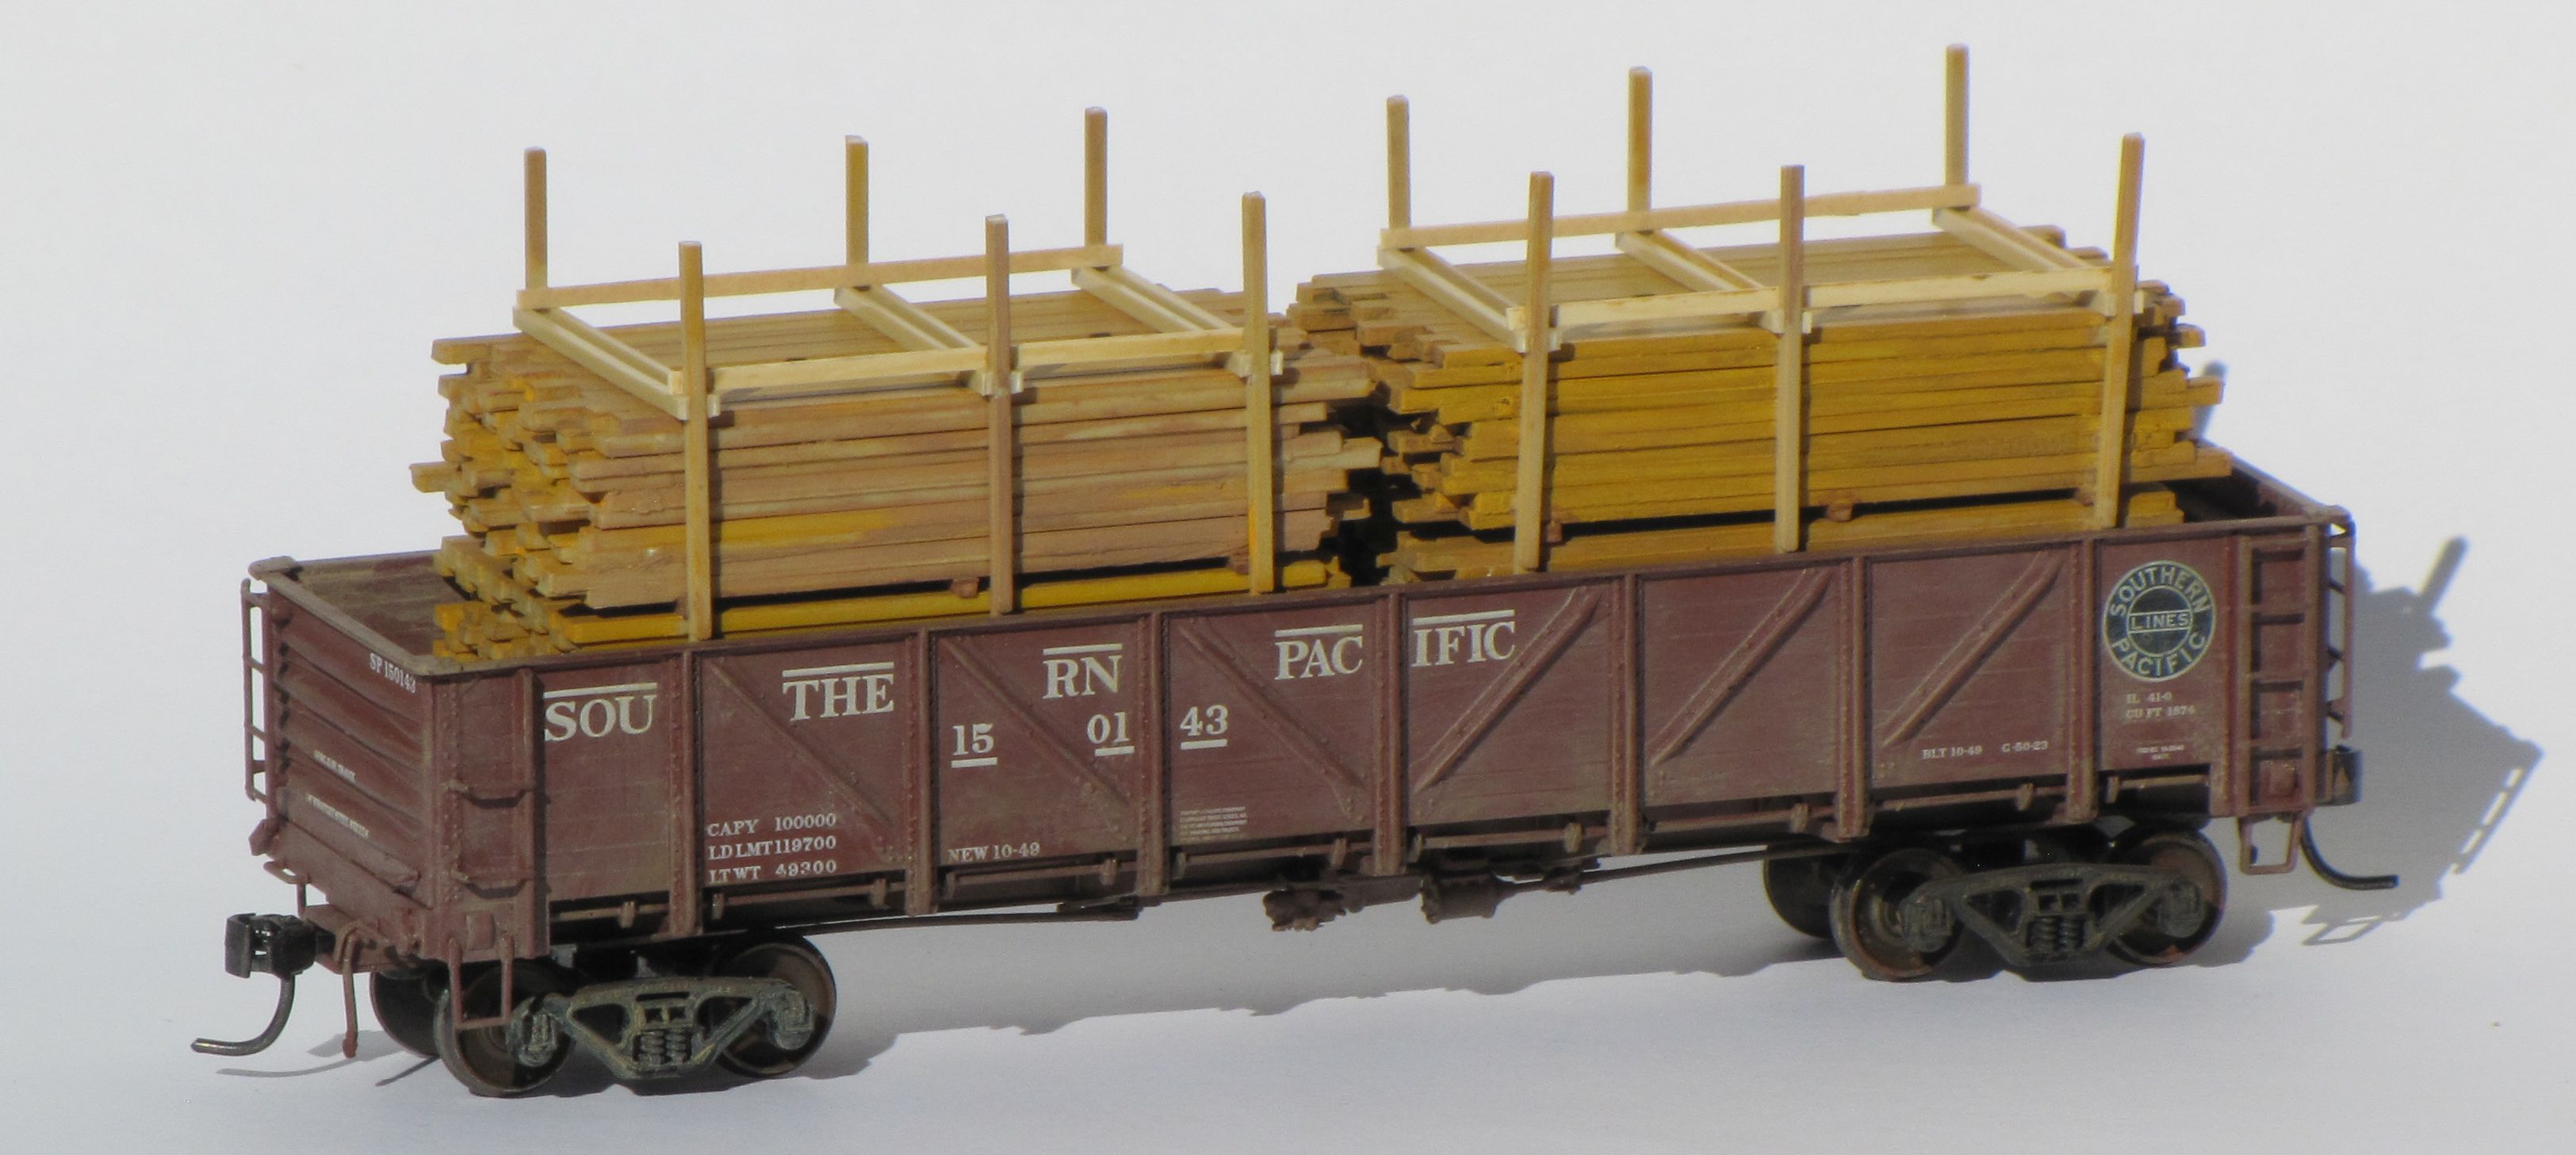
I followed up that project with a second gondola from Red Caboose/Intermountain. Model photos of the HO scale gondola:

https://tinyurl.com/y4b42btj

http://www.owlmtmodels.com/lumber/OMM3004SP150143-D.jpg

Data, photos and a drawing of this car appeared in the February 1984 issue of Mainline Modeler on Page 54.

I followed the same steps as with the first model, which were to detail and weather the model. Unlike the first model (Accurail), this was an R-T-R model.

I prepared the gondola as usual: Cleaned the truck journals with a reamer, painted the truck frames and faces of the wheels, lubricated the journals with Teflon, sprayed the gondola body with Tamiya TS-80 Flat-Clear and weathered the car body and trucks with various PanPastel media.

The next step was to make a raised styrene base for the load. This base was primed, painted yellow and given a coat of Tamiya TS-80 Flat-Clear.

For lemons I used my original stock of JTT Scenery Products #92124 miniature fruit, which included a packet of lemons. JTT now is owned by Model Rectifier Corporation (MRC), who markets this product as JTT #0592124.

Be advised that these may be the only lemons available in HO scale. Woodland Scenics did not offer scale lemons and neither did Alpine Division Scale Models. Both of these companies no longer offer scale fruit of any kind. In fact, Alpine Division Scale Models no longer is in business.

For lemons your best source is E-Bay for the old JTT stock or MRC.

I coated the base with Pacer Technology's Formula 560 Canopy Glue and sprinkled on some lemons. Adhesion was good. When dry I gave the first layer another coat of Canopy Glue and added more lemons. I added a third coat just for insurance. This produced a good, built-up layer of lemons with no bare spots showing through to the base.

When this was dry, I shook off the excess. The load looked fine so it was placed in the car. Done.

The photo below is the finished model temporarily parked on a siding next to a scratch-built shallow relief model of the Corona Citrus Association Packing House, which still stands. This packing house would not have processed cull lemons so this car is awaiting transfer to the nearby Exchange Lemon Products Plant, which on my railroad probably never will be modeled.


Sunday, August 15, 2021


I Had To Have It: InterMountain HO Scale Borax Hopper

These past five years or so I have tried to make the overall look of my 1956-era Citrus Belt Railway Company more prototypical. To that end I have been eliminating many pieces of rolling stock that had special, overly gaudy paint schemes. Most of these cars were based on actual prototypes. The problem was that having too many of these cars on the railroad was not prototypical. A look at period photos of freight yards will confirm this.

Then InterMountain offered a Pacific Coast Borax Company two-bay hopper in bright yellow with a twenty-mule team graphic. The very definition of a special, overly gaudy paint scheme. I had to have it…if it was prototypical.

Thankfully, an inquiry on the Real Steam Era Freight Car Discussion Group (A great resource for modelers) produced a quick answer with a photo. STMFC discussions noted that five cars, series NAHX 30514-30518, were leased to Pacific Coast Borax. At least one of these cars had the paint scheme seen in the model photo below and that was documented by a prototype photo. Frank Hodina brought the photo to the attention of Ed Hawkins, who shared the photo with the group:

https://realstmfc.groups.io/g/main/message/186256?p=,,,20,0,0,0::recentpostdate%252Fsticky,,borax,20,2,0,84426119

The car on my railroad would be three years old so I plan to only lightly weather it before putting it in service.

Yes, it’s gaudy…but I had to have it.

Bob Chaparro

Hemet, CA


Tuesday, March 24, 2020


Cement Hopper Weathering Project

I wanted to try simulating caked-on cement that typically accumulates on the roofs of cement hoppers. My choice of material was chinchilla dust mixed with weathering powders.

Chinchilla dust was discussed in an earlier message post on Model Railroads of Southern California:

https://groups.io/g/ModelRailroadsofSoCalif/message/15090?p=,,,20,0,0,0::Created,,chinchilla,20,2,0,69402132

The car for this project was a Bowser HO scale two-bay covered hopper built from a kit. I gave the car a coat of Tamiya TS-80 flat clear sealer and then applied PanPastel gray media (Neutral Grey and Payne's Grey Tint). I followed this with another coast of Tamiya TS-80 flat clear sealer. This was the base for the cement weathering.

To make the imitation cement I mixed two parts white weathering powder with one part dark gray weathering powder and one part chinchilla dust. After thoroughly dry mixing these I added 91 percent isopropyl alcohol to make a liquid with the consistency of milk. Be aware that the liquid is much darker than the resulting dry finish.

I applied this liquid to the top and sides of the car and allowed it to dry. When dry I applied a second coat to the car roof.

When the second coat was dry I used a stiff brush to remove excess material, being careful to use light, gentle strokes.

When I was satisfied with the appearance of the car I gave it a sealing spray of Tamiya TS-80 flat clear sealer.

The simulated cement on the car roof is more grainy than would be seen on a prototype car but the exaggeration is for effect. This is nothing unusual as in this hobby we have exaggerated rivets, even high-end cars, as well as exaggerated wood grain on cars and structures. It's all for effect.

Wednesday, March 18, 2020


Corrugated Pipe Load Project

This was another HO scale open car load project. The corrugated pipe load came from Grain Belt Models, available on the Iowa Scaled Engineering website:


All I did to the pipes was ream the ends to achieve a thinner, more prototypical cross section, prime and paint them. I then glued the pipes together in rows of three, attached to crosswise wood supports with space allowed for vertical spacers to be added later. The rows were then glued together with the vertical spacers added.

The car was an InterMountain/Red Caboose general service drop-bottom gondola. I weathered the car a bit and painted the wheel faces and trucks.

The wood cribbing, supports and spacers were based on prototype photos.

The steel bands were the narrowest chart tape I could find. They do not scale-out to a prototypical two inches and are closer to five inches wide. But they do provide a good visual effect.

This was a very easy project any modeler with a little experience and a few tools could accomplish.

Bob Chaparro


Friday, January 3, 2020

Scenery Material: Chinchilla Dust


I discovered this versatile scenery material while watching a video by Marklinofsweden on making Magic Scenery Dust. The video mentioned Chinchilla Dust as one alternative to making the Magic Scenery Dust seen in the video.


Here is a link to the video:


So what is Chinchilla Dust? It's volcanic pumice ground to a fine, non-magnetic gray powder that can be used for dirt roads and paths. It also could be used as ballast in scales smaller than HO.


I bought a twenty-seven ounce container at Wal-Mart for less than six dollars. Identical-looking (I checked) Chinchilla Dust also is available at PetSmart and Petco at a slightly higher cost per ounce.

I was hoping I could use it as a substitute for Monster Model Works "Dirty Dirt" as this fine scenery product no longer is available.

As it turns out, the Chinchilla Dust is finer and more gray than the Dirty Dirt.

But it still can be used the same way Dirty Dirt was used. And like Dirty Dirt, it does not darken when fixed in place with diluted glue or Woodland Scenics Scenic Cement.


I like the wide array of colors for various earth tones offered by Bragdon's and Doc O'Brien's weathering powders but these are much too expensive to use in large quantities to simulate dirt. But mixing these powders with the Chinchilla Dust at one-to-three ratio produces the same powder shades to use as dirt at a fraction of the cost. I found these mixtures can be applied just like the Dirty Dirt: Sprinkle on, dampen with wet water and apply Scenic Cement.


I assume powdered artist's chalk could be used in much the same manner.

Sunday, November 3, 2019

Empty Gondola Project


Empty Gondola Project

I've been working on several HO scale gondola projects involving various loads. This particular project originally started out to be a gondola with a load of large earth moving equipment tires.

The car was an Accurail 3700 Series 41-foot steel gondola lettered for the Pittsburgh & West Virginia Railroad. Accurail's description and photo of this car had a build date of November 1948 and a reweight date of May 1952, good for my 1956 modeling era.

So that's what I ordered from Accurail. Imagine my surprise when the car I received had the same body but a build date of May 1926. Looks like I'll need to do some paint patch/decal work in the future.


The tire load came from a general hobby shop that carries R/C models. I had been looking for tires for several months and settled on eight tires for an R/C car that perfectly fit the gondola and looked OK, not great, for earth moving equipment tires.

Then the project took an unexpected turn. As I began weathering the car with special attention to the steel floor I realized that the rusted effect was better than my usual efforts. I had been using a combination of AK Interactive washes, Vallejo paints and Doc O'Brien's weathering powders built up in layers with each layer receiving a protective coat of flat finish.


All of this work would have been hidden with the tire load so the plan morphed in an empty gondola project.

The tire load is destined for another gondola awaiting inspection, weathering, etc.


Saturday, August 17, 2019


Caswell Gondola Project


The Caswell gondolas were among the most distinctive cars in the Santa Fe freight car fleet. The Caswell system was marketed by the National Dump Car Company and the cars were built by American Car & Foundry. The dump system consisted of horizontal shafts with pinion gears moving on racks in the cross bearers to open and close the doors. The doors were opened by cranks on the ends of the cars. These controlled shafts that ran the length of the car. As the shaft was cranked towards the center sill, the doors opened.


From 1905 to 1927 the Santa Fe acquired 8,800 Caswell gondolas. Many cars were rebuilt in the 1940s with AB brakes and side stiffeners. As older classes were rebuilt, solid floors were laid on top of the drop floors but the shafts were not removed.


Some 8,450 of them were the basis of the model made by the InterMountain Railway Company.


I began with an InterMountain HO scale car. I've had the car for years, hidden away in a box. At the recent NMRA National Train Show I found a perfect resin used tie load from Monroe Models.


The load motivated me to liberate the car from storage and work on it.


I gave the car a base coat of Tamiya Clear Coat spray (TS-80). This is a dead flat finish that comes out as a very fine spray. It's much better than Testors  Dullcote, which was reformulated several years ago. I then applied a wash of Doc O'Brien's Rusty Red powder mixed with 91 percent isopropyl alcohol. This wash toned down the otherwise crisp, bright lettering. Then another Tamiya Clear Coat was applied to seal the powder.


I used various PanPastel artists' dry color media applied with soft brushes to weather the car. I gave the car an overall dusty look with a little dark grime along the bottom and some limited rust effects on the dumping hardware and side framing. The car's reporting marks became a little too obscure so I erased some of the PanPastel media with a soft white rubber eraser and then sparingly reapplied more PanPastel to that area.


I painted the wheel faces with Floquil Grimy Black and the truck frames with Krylon Red Oxide Primer. I've painted a lot of truck frames over the years with several brands of red oxide primer. I have had a few paint failures but that was due to being lazy and not cleaning the mold release off the trucks. The truck frames also received a little PanPastel treatment.


I added a few white chalk marks using a Prismacolor Verithin artist pencil.


The four-piece resin tie load was a little too long for the interior length of the gondola so I removed several protruding bottom ties with a rail nipper and sanded the cuts smooth. I painted a few ties with grimy black for a little visual variation and gave the four pieces a light spray of Tamiya Clear Coat.


The ties were secured with a small dab of Tacky Glue to allow later removal if needed.


Although there were a lot of steps involved, each step was quite simple. I'm pleased with the result.


Thursday, May 30, 2019

A Smudge Oil Loading Facility For The Citrus Belt Railway


A Smudge Oil Loading Facility For The Citrus Belt Railway

I decided to upgrade my smudge oil facility by adding an area with a fuel loading rack from the Walthers truck-served fuel distributor and some details such as a small office, fire hydrant, fire hose, oil drums, pallets, light poles, people and vegetation.

I didn't want to assemble and install all the small parts inside the fuel loading rack so I took a cue from another modeler who placed a wall over the front of the structure and extended some pipes through the wall to the outside.

The overall design and arrangement is not based on any specific prototype. It's just my concept of how such a scene should be represented.

The next thing I need to do is to add some oil stains under the outlet pipes and some signage.

Below are photos of this area plus the smudge oil tanks and the unloading spur.

The two small smudge oil tanks are similar to the tanks that were in Redlands, CA, and the large tank is similar to the tank that was located in Claremont, CA. The small tanks are Rix oil tanks with roofs from Rix grain bins, as the original oil tank roofs were too steep.

Behind the smudge oil spur is the Genco Olive Oil Company. You may remember this company as the legitimate business front for the Corleone crime family in the Godfather movies. The sign was found on-line and made on my printer.


Sunday, May 26, 2019

Some Random Scenes

These are some random scenes from the railroad.
Abandoned industrial spur.


Former spur used for circus-style loading and unloading


A work-in-progress cattle loading pen and ramp.


Leftovers from a recent track rehabilitation project.


One of two hobo camps on the railroad. I can't get these folks to move!


Along the mainline. In the background are several citrus packing houses.


A scene like this has been done to death but I just had to stage the 1956 Buick CHP car from the TV show "Highway Patrol" starring Broderick Crawford. I'm still looking for an appropriate HO scale figure of a man in a suit and hat.


Saturday, May 25, 2019

Gondola With Automobile Frame Load Project


Gondola With Automobile Frame Load Project

I finally finished this very satisfying but simple project. It all started with a similar gondola I saw on Andrew Merriam's layout during the Central Coast Railroad Festival last October. That motivated me to look for prototype examples.

What I found were gondolas with an assortment of load restraining designs, each similar but probably specific to individual railroads. But the photos gave me ideas for my own design to be applied to an InterMountain HO scale Southern Pacific gondola.

The gondolas (and probably the flat cars) that carried automobile frames usually were in dedicated service. The SP community I consulted could not say for sure that SP had any such dedicated cars. Most of the prototypes I saw were from eastern railroads with the notable exception of the Santa Fe. At the time I couldn't find the appropriate Santa Fe Ga-44 gondola that InterMountain once produced. This car would have been my first choice, although two automobile frame kits would have been necessary to complete the load and a lot of frames would have been left over.

The HO scale automobile frames were made by JJM Railroad Enterprises. These can be purchased from B&G Train World. Scroll down this link:

On the DT&I Modelers Page website Scott Heiden designed a simple cardboard jig for assembling the automobile frames:


I built a similar jig from two wood blocks glued to cardboard that was glued to Styrofoam. From the prototype photos and Scott's example I chose forty-degrees as the angle for the frames to rest upright in the gondola. I used double-sided tape to secure one frame in place on the jig at a forty degree angle and then added five more frames to the jig, gluing frames two through six together and leaving the first frame in place as part of the jig.


 Straight pins helped to keep the frames together as the solvent glue set. I then glued the groups of five frames together until I had enough for one side of the gondola. These frame groups were secured with a strip of plastic glued along the bottom. This strip would not be visible on the finished load once it was in the gondola.

I constructed restraining hardware (frame cradle and hold-down harness) from Evergreen styrene channel and "L" stock. I added stained strip wood to the contact surfaces. Lastly, I used brass wire for the hold-down harness tension rods.


I drilled two holes in the hold-down harness for the rods. On the top side of the hole I inserted Tichy plastic nut-bolt-washer castings.

If you don't want to scratch-build the restraining hardware, American Model Builders does offer a kit for restraining hardware at $18.00. Here is the link: http://www.bgtrainworld.com/storefront/shop/item.aspx?itemid=3379

Like I said, this was very satisfying but simple project. I paid $13.00 for the auto frames and the other materials were from the parts and scratch-building trays.

Bob Chaparro
Hemet, CA
++++
After I finished the project I found this very informative article on automobile frame loads by John Brown:


Monday, March 26, 2018

The View Block


The View Block


The middle of the layout is a peninsula with the mainline running along the perimeter. Even with the relatively high benchwork one could see across the entire layout, which destroyed any pretense of a much larger railroad.


I knew even as I designed the track plan that I would need a view block. I just didn't know how I would construct it. And I still didn't have a design for the view block even after I completed the bench work and nearly all the trackage.


Another advantage of the view block would be the availability to two more surfaces on which to mount shallow relief structures.


I started with some cardboard sections just to test the height required. I settled on about ten inches, which would block the view of most people not on the roster of an NBA team. Because the benchwork was an open grid design it would be easy to insert vertical supports for the view block from the underside of the layout, making them stronger that surface-mounted supports.


The final design consisted of 1" x 4" vertical supports with 1" x 4" bases. Three view block assemblies made from quarter inch tempered Masonite panels would be dropped in over the vertical supports. Each assembly had a partial frame made from 1" x 2" boards with a full tongue-and-grove end section that allowed the assemblies to interlock.


I started by gluing Masonite panel side to the partial frame pieces and then clamping this to the vertical supports. Once the glue dried I repeated this with the other panel. When this was dried I removed the section from the vertical supports to screw the panels to the frame pieces. Screws on the surface of the assemblies were countersunk and covered with a spackling compound.


The view block assemblies were test fitted and then primed twice, painted twice with sky blue paint and installed on the layout. One side received mountain and hill scenery that was painted-on using recorded paint formulas matching the existing backdrops. The total length of the view block is just shy of fifteen feet.


The pictures below show much of what is described. After installation I was able to install twenty-one shallow relief structures against the view block. Most of these structures were either full size structures cut down to the appropriate depth or scratch-built.


What would I do differently? Probably I would install the view block earlier, just after installing the track but before scenery and structures. This would have made the process a little easier but not by much.


Vertical Support
Vertical Supports Mounted To Benchwork
Gluing The Frame Pieces To The View Block

Test Fitting The View Block
Test Fitting
  
Painting


View Block Before Scenery Paint
 
Almost Complete
 

Friday, March 2, 2018

Recycled Tank Cars On The Layout


As was typical in areas near railroad tracks in the 1950s, there are several recycled freight cars on the layout, including tank cars. I use these recycled tank cars as the focal point of various mini-scenes.


All of the tank cars were purchased at swap meets for a few dollars or less and then weathered as one might expect for a recycled car. Weathering consisted of dry-brushed paints, weathering powders and washes made from diluted paints and alcohol/weathering powder solutions.


The one heavily rusted tank car (below) was an experiment in which I spread a layer of glue on the car body and then sprinkled on rottenstone. I then coated the surface with rust colored weathering powder.


Rottenstone is weathered limestone mixed with various forms of silica. Also known as "tripoli", it is a fine powdered porous rock used as a polishing abrasive for metal and wood finishing. It has applications similar to pumice.


As used on this tank car body the rust effect is extreme and maybe a bit overdone.


Details were added to complete the scenes. I have boxes of detail parts so there always a lot of choices to for finishing each mini-scene.


Below are photos of these mini-scenes.