Wednesday, November 30, 2016

Beginnings Of The Current Layout

By the fall in 2006 we had purchased the first home to be sold in a future Del Webb "active senior community" in Hemet. Our model featured a separate "casita" (or granny flat) in front of the main house, a perfect man cave as it was designed but in need of alterations to become a suitable layout room.

At the time of purchase not a spade of dirt had been turned for this community. I asked if the builder would construct the casita without the dividing wall and other obstacles to having a full, open layout room. I was politely refused. This was 2006 and home builders were selling every home they built almost as soon as these were completed. No concessions to buyers were required. Two years later the housing bubble burst and at that point I could have asked for the same thing and gotten it.


I made plans for converting the casita to a layout room. In July 2007 we moved in and a track plan was completed in October.  I found a reputable contractor who removed the partition wall, bathroom and closet, transferring all the new components to a rental unit he owned. The work was done in such a way that the room easily could be converted back into a living unit in the future. The resulting layout room was nominally 12 feet by 20 feet.

In February 2008 new carpet was installed and the walls were painted the obligatory sky blue. The ceiling was given another two coats of white paint following two coats of primer in the hope that I would never have to paint it again. The two, intrusive inward opening doors were replaced with a single sliding door.


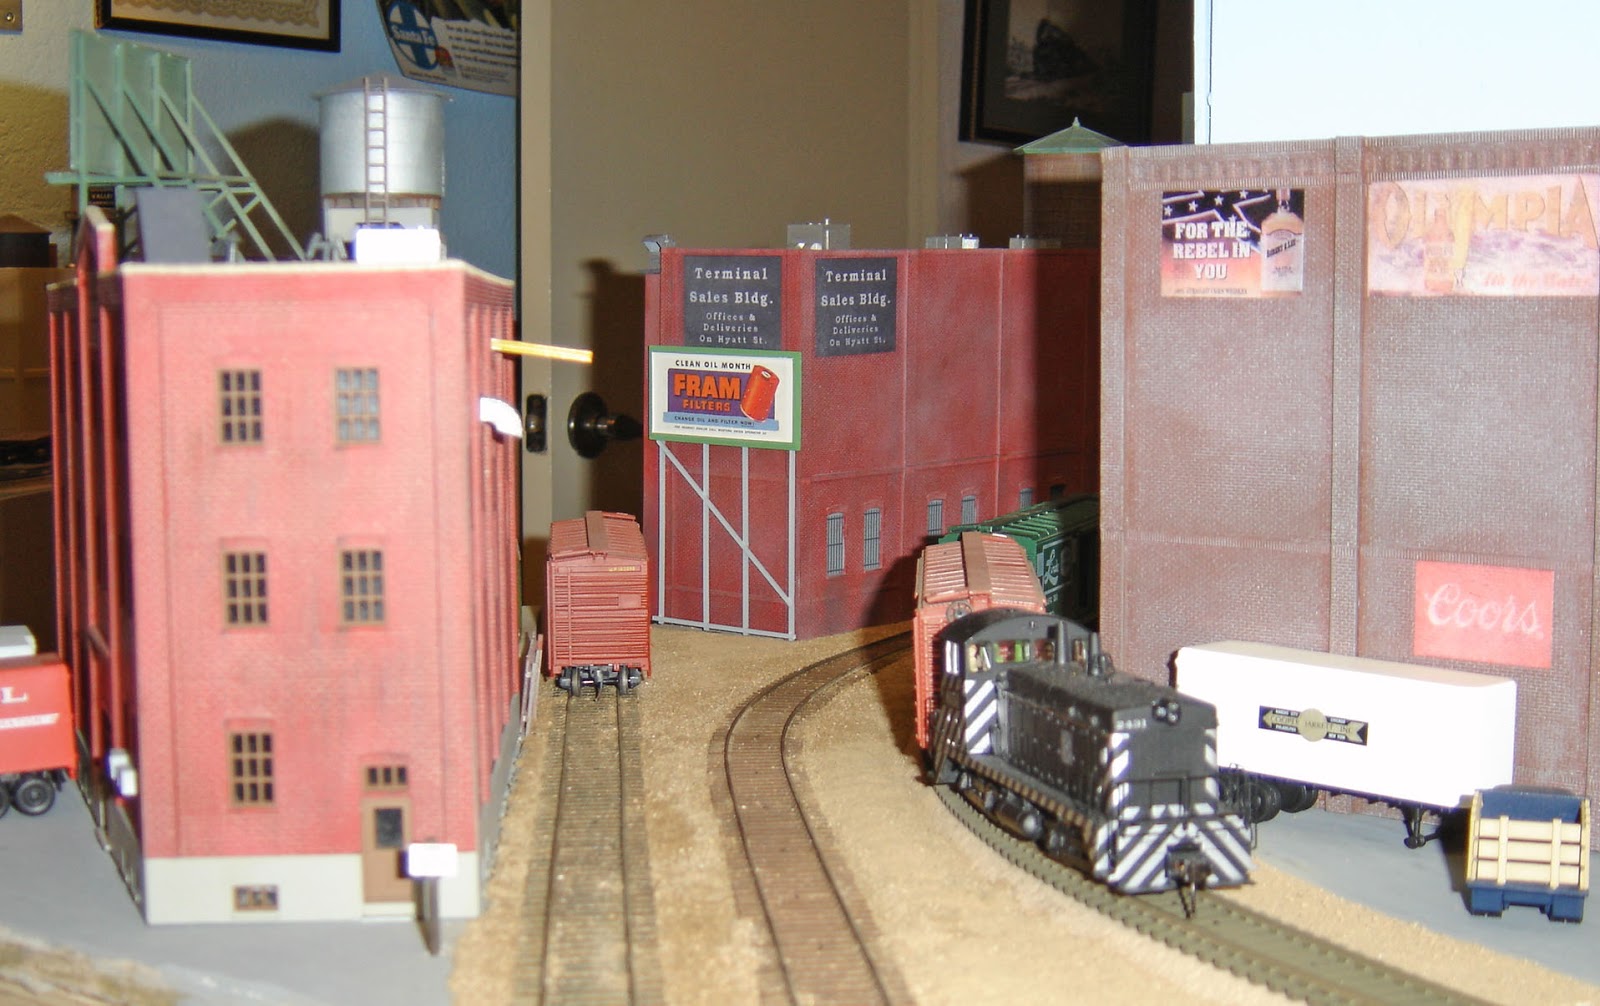
The basic track plan ran around the walls and around a peninsula. Industries would line the walls and a citrus packing house district would be placed inside the peninsula. A swing gate would be built in front of the entrance.

The benchwork was set at 58 inches. At this height the trains would be viewed at nearly eye level for the average person. In a quest for a maximum layout area the aisle space narrows to 28 inches in several places. With the high benchwork there actually is more than 28 inches of clearance at belly level.

Benchwork construction began in March 2008. Much of the lumber came from previous layouts as these were built using screws rather than nails.


Monday, November 28, 2016

38 Freight Cars: Maintenance Required

A few years ago I drafted thirty-eight HO scale freight cars for future service on the modules of a local module club. Most of these cars came from storage and are as much as forty years old. Some came from my current layout. The stored cars had operated on my previous home layouts going back many years. Cars from Athearn, Roundhouse, Train Miniature, Lindberg and Accurail made up the collection and these were mainly boxcars. These cars are suited to module service as they have few details that can be damaged from transport and careless handling by club members.

The manufacturer-supplied weighting system was used when the cars were built except for one car acquired at a swap meet. Most of the cars had their original trucks replaced with metal wheels in metal truck frames (Central Valley) and the balance had their plastic wheels replaced with metal wheels.

I put the cars through a performance tests and this is what I found.

Thirty-three cars failed to roll down a two percent grade from a standing start. Mind you, many clubs require cars to roll down a one-and-a-half percent grade.

Since these cars are going to be used only every few months I decided not to invest in new trucks…especially for cars that cost as little as $1.29 originally.

Given that most of the cars had metal truck frames I did not want to use a truck reamer intended for plastic frames. An appropriate sized drill bit is a good alternative but I used a procedure that didn’t require removing the axles from the frames. I avoided this as all the metal trucks had springs and there is a risk of accidentally disassembling the truck when you remove the axles.

I disassembled all of the plastic truck frames and applied the truck reamer.


To lubricate the journals I used Elmer’s Slide-All Teflon dry lubricant. What I like about this product (typically available from hardware stores and locksmiths) is that it goes on wet and then quickly dries, leaving a Teflon coating on the target surface. This is much better than using dry Teflon to start. I sprayed a little of the product in a small container and then applied it to the journals with a micro-brush.


After I did this most of the cars easily passed the two percent grade test. I will say most of the cars also required other maintenance (mostly coupler and weight adjustments) to bring them up to snuff.


Sunday, November 27, 2016

The Third Citrus Belt Layout

At the time this layout was started I was still in Mission Viejo. For several years my wife suggested that we convert the upstairs layout room, home to the Citrus Belt II, into a dedicated gym. In the adjacent guest bedroom we had several pieces of professional quality gym equipment that we used regularly but the equipment made the room very crowded. The idea was to make the guest bedroom more hospitable.

This is the same guest bedroom in which I was trying without success to requisition for a very modest three-track staging yard along the back wall. The staging tracks would have greatly improved the operations potential for the layout in the adjacent bedroom.

My wife had an alternative plan in mind. As proposed by her, a new layout was to be located downstairs in the living room, which we seldom used. It was unexploited space in both our minds.
 
I was opposed to this until (1) I contemplated  converting the upstairs layout to DCC and (2) I discovered that there was more space in the living room than I had roughly calculated without actually measuring and (3) I determined that the open wall between the living room and the dining room gave me terrific access to the third side of the layout.


Construction on a two-level walk-in layout began in 2006. The design avoided all the past mistakes and reflected an operations-oriented track plan focused on the citrus industry, circa 1956. By this time I had created the Citrus Industry Modeling Group on Yahoo and had collected a lot of material on the industry and the related railroad operations.

In just a few months all the upper level benchwork, track, turnout machines and several industries were installed as were my first real backdrops.  


Benchwork for the lower level had just started when my wife convinced me to move. I was a hard sell on the idea but I eventually came around. One condition was that any new home would have to have ample space for a layout. A second condition was that further moves were not an option until my death, major disability or abduction by alien beings.


Moving also extricated us from the whispers in the neighborhood about what that peculiar man was constructing in his living room.

So the Citrus Belt III died an early death but its ill-fated corpse donated organs (track, turnouts, switch machines, previously implanted structures from other dead layouts and even backdrops) for a future layout in a new town.

Saturday, November 26, 2016


Simple Weathering Tools For Chalks & Powders

I've finished my initial testing of some simple weathering tools for applying and blending weathering chalks and powders. These basically are artist's "smudging" tools for applying the weathering medium. These tools can be used in addition to brushes and foam tools or as an alternative to these same tools.

I weathered five freight cars using Bragdon and Doc O'Brien's weathering powders plus PanPastel pigments. Some cars were given an initial wash of various Bragdon powders dissolved in 99% isopropyl alcohol. All cars were given a coating of Testor's Dullcote before weathering with the powders and pigments.


The two brands I tested were Fantastix by Tsukineko and Style Stix by Loew-Cornell . Both come with several tip shapes and sizes.


You'll notice that the Style Stix are larger. For me this makes weathering a freight car with the Style Stix wedge tip tool a little easier as coverage is faster. I found the Fantastix tool with the pointed tip better for working small and tight areas.

The Style Stix are available at Hobby Lobby. Fantastix are available at Wal-Mart in the crafts section but much better prices can be found on-line. I didn't find either tool at Michael's.

Pete Steinmetz recommend another tool set, color shapers by Royal Sovereign Ltd. These have rubber tips and are described as clay shapers. I have a set and will try these next.


Friday, November 25, 2016

The Second Citrus Belt Railway & Previous Layouts

My second Citrus Belt Railway was built between 1999 and 2005 in Mission Viejo, CA. The design of this layout evolved from my two earlier railroads. Two residence relocations and the subsequent downsizing of available layout space triggered this evolution.

The original railroad (the Cajon & Santa Fe) was located in Corona, CA.  This railroad occupied a substantial portion of a 576 square foot family room.  There were few design restrictions with this amount of space.  For all its size, this railroad was not a particularly operations-oriented railroad.  However, over the years it did serve well for show running through many well-attended open house sessions.  The home containing this railroad was lost to a divorce. Rolling stock and most structures survived but not the scenery.

The second railroad (also in Corona) was the first Citrus Belt Railway. The concept of a dual era layout, generally representing Orange and Riverside Counties, came into focus with this railroad.  The available space shrunk to about 350 square feet shared between two adjacent bedrooms.  A small wall opening connected the rooms. To maximize both running and operations, the track plan featured two visible levels linked by a helix concealed in a closet.  The railroad was never completed, although most of the benchwork was installed and enough track was laid to allow simple operations in the larger bedroom.  The home containing this railroad was sold to accommodate a marriage.

The third railroad was the second Citrus Belt Railway.  In this edition the space available was the least amount to date, measuring but 165 square feet supplemented by closet space.  Several track plans were considered, most promoting long show runs and elaborate operations.  Each of these plans required a dreadful amount of hidden trackage, confined access areas and difficult construction.  In the end, the desired results did not justify the complex construction and maintenance requirements.

To permit both prototypical operations for experienced modelers and show running for the general public, I developed a three-level track plan with a walk-in design for the lower level and no connection between the top and middle levels. This plan eliminated most severe track grades, reduced hidden trackwork and abolished the need for a space-consuming helix.

The top level concentrated on show running with fairly simple switching operations.  The middle level was to balance running and operations.  The lower level was dedicated to staging trains, industrial switching and breaking-up/assembling cuts of cars for through freights. A section of connecting track with a moderate grade linked the lower and middle levels.

The detailed track plan for the middle level still was under development pending negotiations to secure trackage rights in the adjacent bedroom. This never was accomplished, however. 

The overall track plan was a compromise, but it was quite workable and achieved most of my original objectives.

Facts & Figures

Initial Benchwork: March 1999
First Operating Train: Sept. 1999
Scale:  HO (1/87 Actual Size)
Gauge:  HO Standard
Periods Modeled: 1956 & 1971
Room Size: Main Area = 15' x 11",
I65 sq. ft. overall.
Levels: 3
Trackwork: Code 83 mainline, Code 70 yards and spurs (all pre-fab) over cork
Track Length: Not determined
Minimum Radius: 24"
Maximum Grade: 2.5% Visible
Turnouts: To be determined
Control: Conventional DC cab control
Benchwork: 1/2" Homasote over 1/2" plywood over 1 x 4 pine grid.
Sub-Scenery: Casting plaster over Hydrocal-soaked Handi-wipes and Woodland Scenics plaster cloth, cardboard lattice, wadded newsprint and Styrofoam.


Thursday, November 24, 2016

Welcom To My Blog


Welcome to my blog.

I created this blog to share my interest in model railroading, to highlight progress on my model railroad and to interact with other model railroaders.

My HO scale railroad is the Citrus Belt Railway Company. This is the fifth major layout I have built since 1978. An earlier Citrus Belt Railway appeared on Model Railroads of Southern California Layout Tour #1. That layout was located in Mission Viejo and was the second layout to carry that name. There was a previous CBRy in Corona (my second Corona layout) and a later CBRy in the living room at the residence in Mission Viejo.

The design of the present Citrus Belt Railway in Hemet evolved from these four earlier railroads, three residence relocations, the subsequent downsizing of available layout space and a decision to focus on one single year, one general geographic location and one major industry.

The current layout fills a 12 foot x 20 foot dedicated room and highlights the 1950s Southern California citrus industry with scratchbuilt replicas of several area packing houses. Both the Santa Fe and Southern Pacific are represented as they are the owners of this imaginary short line.

The double track mainline is nearly two scale miles long and runs around the walls and a peninsula in a continuous loop. There is a visible two-track staging yard and a return loop (not yet operational) for a developing packing house and industrial district.

Most scenery and structures are in place and several mini-scenes have been created. There are a number of kit-bashed structures and a few scratch-built as well. The layout features painted backdrops and a viewblock that separates the two sides of the peninsula. Power is wireless NCE DCC. Motive power is primarily first generation diesel with a few steam engines available just for fun. Entering the layout room requires negotiating a slight 54 inch duckunder.

Layout Specifics –

Era Modeled: 1956
Benchwork: 1/2" Homasote over 1/2" plywood over 1 x 4 pine grid
Trackwork: Atlas Code 83 mainline and yards, Code 70 on some spurs
Turnouts: 27 (Tortoise on mainline and Blue Point on secondary track and spurs)
Minimum Radius: 28"
Grade: 0.0 percent
Packing Houses: 6
Other Structures: 60-plus

For a number of year I have owner and managed three Yahoo group devoted to railroad/model railroad interests. These are:

Model Railroads Of Southern California – A group for Southern California model railroaders and model railroad layout owners to share their progress, experiences, tips and techniques with each other. All Southern California model railroaders, with or without layouts, are very welcome to join.  Over 1,600 members!

We do free layout tours…51 tours/700-plus layouts since 2006.


Citrus Industry Modeling Group – A group for modelers, railfans and historians.  The group collects and shares information about the operations of the Santa Fe, Pacific Electric, Pacific Fruit Express (Southern Pacific & Union Pacific Railroads) as they relate to Southern California's citrus industry. The group also collects and shares information about citrus farming, packing and shipping activities with a concentration on the ice bunker refrigerator car era.


Railway Bull Shippers Group – A group for model railroaders, railfans and historians. This group collects and shares information about railroad livestock and meat transportation and the rolling stock, facilities and operations which supported it. This group covers any railroad in North America, plus the meat packing business. This group helps members to use this information to model prototype railroad equipment, conduct realistic operations on model railroads and create accurate infrastructure.