Thursday, December 9, 2021


Gondola With Scrap Steel Load Project

This is a Revell HO scale gondola I picked-up at the Whistle Stop in Pasadena for $3.00. Fred’s price point was just too alluring to ignore. This model dates to the mid-1950s so it’s just about as old as the six-transistor radio I still own, but that’s another story.

By the standards of the day this was a pretty good model when introduced, featuring a low center of gravity and free rolling sprung trucks with metal frames. All details were cast on the body. But for my purposes I replaced the sill steps with steps from A-Line and retired the trucks as the flanges of the plastic wheels were a bit too deep and the trucks had talgo-mounted couplers. My replacement trucks from Old Pullman had metal wheels.

I installed a Kadee-compatible coupler mounted in a Kadee coupler box. The coupler box was secured to the body with a screw.

I thought I needed a new brake wheel as I did not see one on the car. Upon closer inspection I discovered the car had a simulated lever brake wheel. These were found on prototype cars but I can’t think of any I have seen on the several hundred freight cars from many manufacturers on my roster. Something different yet still prototypical.

Now to the load. I cut up a large plastic drinking cup and the plastic tops of takeout food containers to make scrap steel for the load. The thin cross section of this plastic makes them idea as a starting point for prototype scrap. The pieces are supposed to represent steel sheet cut from storage tanks or ships. Truthfully, my pieces are a bit too large for this type of scrap going to a steel mill for recycling. The pieces probably should be no larger than four-feet by four feet, or thereabouts.

The pieces were painted with either red oxide or dark gray automobile primer paints. Some of these pieces received a second coat of Rust-Oleum Rustic Umber Multicolor Textured spray paint.

When dry each piece received a dusting of one of several PanPastel rust and earth toned weathering media. The objective was to differentiate the individual pieces so they did not all appear to be the same rusty color. The pieces with the textured paint took on the appearance of heavily rusted metal, further distinguishing the individual pieces.

I intended this to be a permanent load so the pieces were glued into place with Canopy Glue, one layer at a time. They received further dusting with various PanPastel media.

In terms of time and effort this was a simple load to construct. And I received some satisfaction from being able to use such an old model on my railroad.


Saturday, December 4, 2021


Swift Reefer Trio

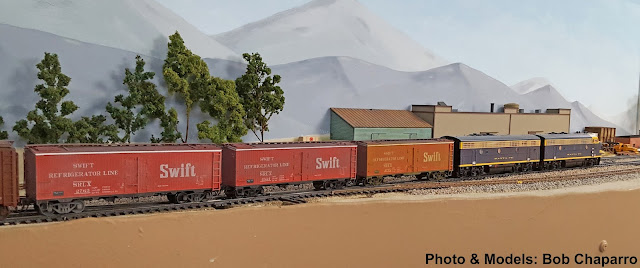
Here is a trio of Rapido HO scale Swift meat reefers on my Citrus Belt Railway. They are some of the mainly empty freight cars being hauled from the Los Angeles area to San Bernardino, where they will be blocked and sent out on various trains headed to the Midwest and Southwest. On my railroad this local train is known as the “Bulldog”, the same name for a similar train once operated by the Santa Fe for a similar purpose.

Until I started the Railway Bull Shippers group ( https://groups.io/g/RailwayBullShippersGroup ) back in 2006 I had no meat reefers on my railroad. This railroad still concentrates on the citrus industry and produce reefers, but the roster of meat reefers grows a bit each year. I just don’t have any meat packers or meat packer branch houses on the railroad, so the cars only appear in moving trains.

The Rapido reefers are highly detailed and operate quite well. The trucks rolled so freely I didn’t bother lubricating the journal cavities with Teflon.

I used PanPastels to weather them. Compared to most prototype photos I have seen of the red Swift reefers these models are a bit more weathered on the sides. However, the prototype photos from the mid-1950s show a lot of soot on the roofs and wheels splash residue on the ends. My guess is that Swift regularly cleaned the sides of their cars but didn’t bother with the ends or roofs.


Thursday, December 2, 2021


Modeling Project: Second Cull Lemon Load In A Gondola

An article on prototype gondolas for transporting lemons was posted on the Railroad Citrus Industry Modeling Group in 2018:

https://tinyurl.com/3m7yr5p2

The article kindled my interest in building an HO scale gondola with a cull lemon load. I reported on this project last year:

https://tinyurl.com/bddpf3dx

I followed up that project with a second gondola from Red Caboose/Intermountain. Model photos of the HO scale gondola:

https://tinyurl.com/y4b42btj

http://www.owlmtmodels.com/lumber/OMM3004SP150143-D.jpg

Data, photos and a drawing of this car appeared in the February 1984 issue of Mainline Modeler on Page 54.

I followed the same steps as with the first model, which were to detail and weather the model. Unlike the first model (Accurail), this was an R-T-R model.

I prepared the gondola as usual: Cleaned the truck journals with a reamer, painted the truck frames and faces of the wheels, lubricated the journals with Teflon, sprayed the gondola body with Tamiya TS-80 Flat-Clear and weathered the car body and trucks with various PanPastel media.

The next step was to make a raised styrene base for the load. This base was primed, painted yellow and given a coat of Tamiya TS-80 Flat-Clear.

For lemons I used my original stock of JTT Scenery Products #92124 miniature fruit, which included a packet of lemons. JTT now is owned by Model Rectifier Corporation (MRC), who markets this product as JTT #0592124.

Be advised that these may be the only lemons available in HO scale. Woodland Scenics did not offer scale lemons and neither did Alpine Division Scale Models. Both of these companies no longer offer scale fruit of any kind. In fact, Alpine Division Scale Models no longer is in business.

For lemons your best source is E-Bay for the old JTT stock or MRC.

I coated the base with Pacer Technology's Formula 560 Canopy Glue and sprinkled on some lemons. Adhesion was good. When dry I gave the first layer another coat of Canopy Glue and added more lemons. I added a third coat just for insurance. This produced a good, built-up layer of lemons with no bare spots showing through to the base.

When this was dry, I shook off the excess. The load looked fine so it was placed in the car. Done.

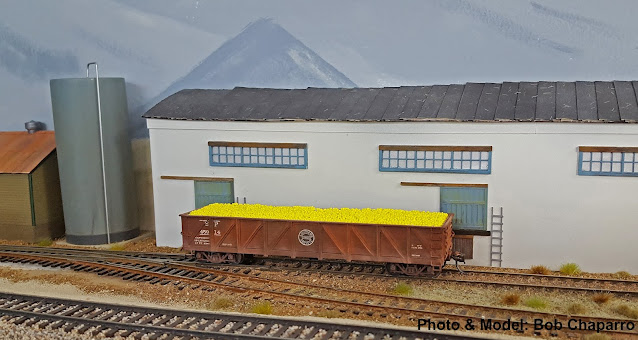
The photo below is the finished model temporarily parked on a siding next to a scratch-built shallow relief model of the Corona Citrus Association Packing House, which still stands. This packing house would not have processed cull lemons so this car is awaiting transfer to the nearby Exchange Lemon Products Plant, which on my railroad probably never will be modeled.


Sunday, August 15, 2021


I Had To Have It: InterMountain HO Scale Borax Hopper

These past five years or so I have tried to make the overall look of my 1956-era Citrus Belt Railway Company more prototypical. To that end I have been eliminating many pieces of rolling stock that had special, overly gaudy paint schemes. Most of these cars were based on actual prototypes. The problem was that having too many of these cars on the railroad was not prototypical. A look at period photos of freight yards will confirm this.

Then InterMountain offered a Pacific Coast Borax Company two-bay hopper in bright yellow with a twenty-mule team graphic. The very definition of a special, overly gaudy paint scheme. I had to have it…if it was prototypical.

Thankfully, an inquiry on the Real Steam Era Freight Car Discussion Group (A great resource for modelers) produced a quick answer with a photo. STMFC discussions noted that five cars, series NAHX 30514-30518, were leased to Pacific Coast Borax. At least one of these cars had the paint scheme seen in the model photo below and that was documented by a prototype photo. Frank Hodina brought the photo to the attention of Ed Hawkins, who shared the photo with the group:

https://realstmfc.groups.io/g/main/message/186256?p=,,,20,0,0,0::recentpostdate%252Fsticky,,borax,20,2,0,84426119

The car on my railroad would be three years old so I plan to only lightly weather it before putting it in service.

Yes, it’s gaudy…but I had to have it.

Bob Chaparro

Hemet, CA


Tuesday, March 24, 2020


Cement Hopper Weathering Project

I wanted to try simulating caked-on cement that typically accumulates on the roofs of cement hoppers. My choice of material was chinchilla dust mixed with weathering powders.

Chinchilla dust was discussed in an earlier message post on Model Railroads of Southern California:

https://groups.io/g/ModelRailroadsofSoCalif/message/15090?p=,,,20,0,0,0::Created,,chinchilla,20,2,0,69402132

The car for this project was a Bowser HO scale two-bay covered hopper built from a kit. I gave the car a coat of Tamiya TS-80 flat clear sealer and then applied PanPastel gray media (Neutral Grey and Payne's Grey Tint). I followed this with another coast of Tamiya TS-80 flat clear sealer. This was the base for the cement weathering.

To make the imitation cement I mixed two parts white weathering powder with one part dark gray weathering powder and one part chinchilla dust. After thoroughly dry mixing these I added 91 percent isopropyl alcohol to make a liquid with the consistency of milk. Be aware that the liquid is much darker than the resulting dry finish.

I applied this liquid to the top and sides of the car and allowed it to dry. When dry I applied a second coat to the car roof.

When the second coat was dry I used a stiff brush to remove excess material, being careful to use light, gentle strokes.

When I was satisfied with the appearance of the car I gave it a sealing spray of Tamiya TS-80 flat clear sealer.

The simulated cement on the car roof is more grainy than would be seen on a prototype car but the exaggeration is for effect. This is nothing unusual as in this hobby we have exaggerated rivets, even high-end cars, as well as exaggerated wood grain on cars and structures. It's all for effect.

Wednesday, March 18, 2020


Corrugated Pipe Load Project

This was another HO scale open car load project. The corrugated pipe load came from Grain Belt Models, available on the Iowa Scaled Engineering website:


All I did to the pipes was ream the ends to achieve a thinner, more prototypical cross section, prime and paint them. I then glued the pipes together in rows of three, attached to crosswise wood supports with space allowed for vertical spacers to be added later. The rows were then glued together with the vertical spacers added.

The car was an InterMountain/Red Caboose general service drop-bottom gondola. I weathered the car a bit and painted the wheel faces and trucks.

The wood cribbing, supports and spacers were based on prototype photos.

The steel bands were the narrowest chart tape I could find. They do not scale-out to a prototypical two inches and are closer to five inches wide. But they do provide a good visual effect.

This was a very easy project any modeler with a little experience and a few tools could accomplish.

Bob Chaparro


Friday, January 3, 2020

Scenery Material: Chinchilla Dust


I discovered this versatile scenery material while watching a video by Marklinofsweden on making Magic Scenery Dust. The video mentioned Chinchilla Dust as one alternative to making the Magic Scenery Dust seen in the video.


Here is a link to the video:


So what is Chinchilla Dust? It's volcanic pumice ground to a fine, non-magnetic gray powder that can be used for dirt roads and paths. It also could be used as ballast in scales smaller than HO.


I bought a twenty-seven ounce container at Wal-Mart for less than six dollars. Identical-looking (I checked) Chinchilla Dust also is available at PetSmart and Petco at a slightly higher cost per ounce.

I was hoping I could use it as a substitute for Monster Model Works "Dirty Dirt" as this fine scenery product no longer is available.

As it turns out, the Chinchilla Dust is finer and more gray than the Dirty Dirt.

But it still can be used the same way Dirty Dirt was used. And like Dirty Dirt, it does not darken when fixed in place with diluted glue or Woodland Scenics Scenic Cement.


I like the wide array of colors for various earth tones offered by Bragdon's and Doc O'Brien's weathering powders but these are much too expensive to use in large quantities to simulate dirt. But mixing these powders with the Chinchilla Dust at one-to-three ratio produces the same powder shades to use as dirt at a fraction of the cost. I found these mixtures can be applied just like the Dirty Dirt: Sprinkle on, dampen with wet water and apply Scenic Cement.


I assume powdered artist's chalk could be used in much the same manner.