Wednesday, January 31, 2018

Another Boxcar Acquisition


Over the past two years I have been reducing my fleet of HO scale freight cars. Well over a hundred cars have been given new homes and another large group are being weathered for eventual sale on E-Bay.


I like the more accurate, better detailed freight cars that have come to market in recent years and that is what I purchase...in moderation.


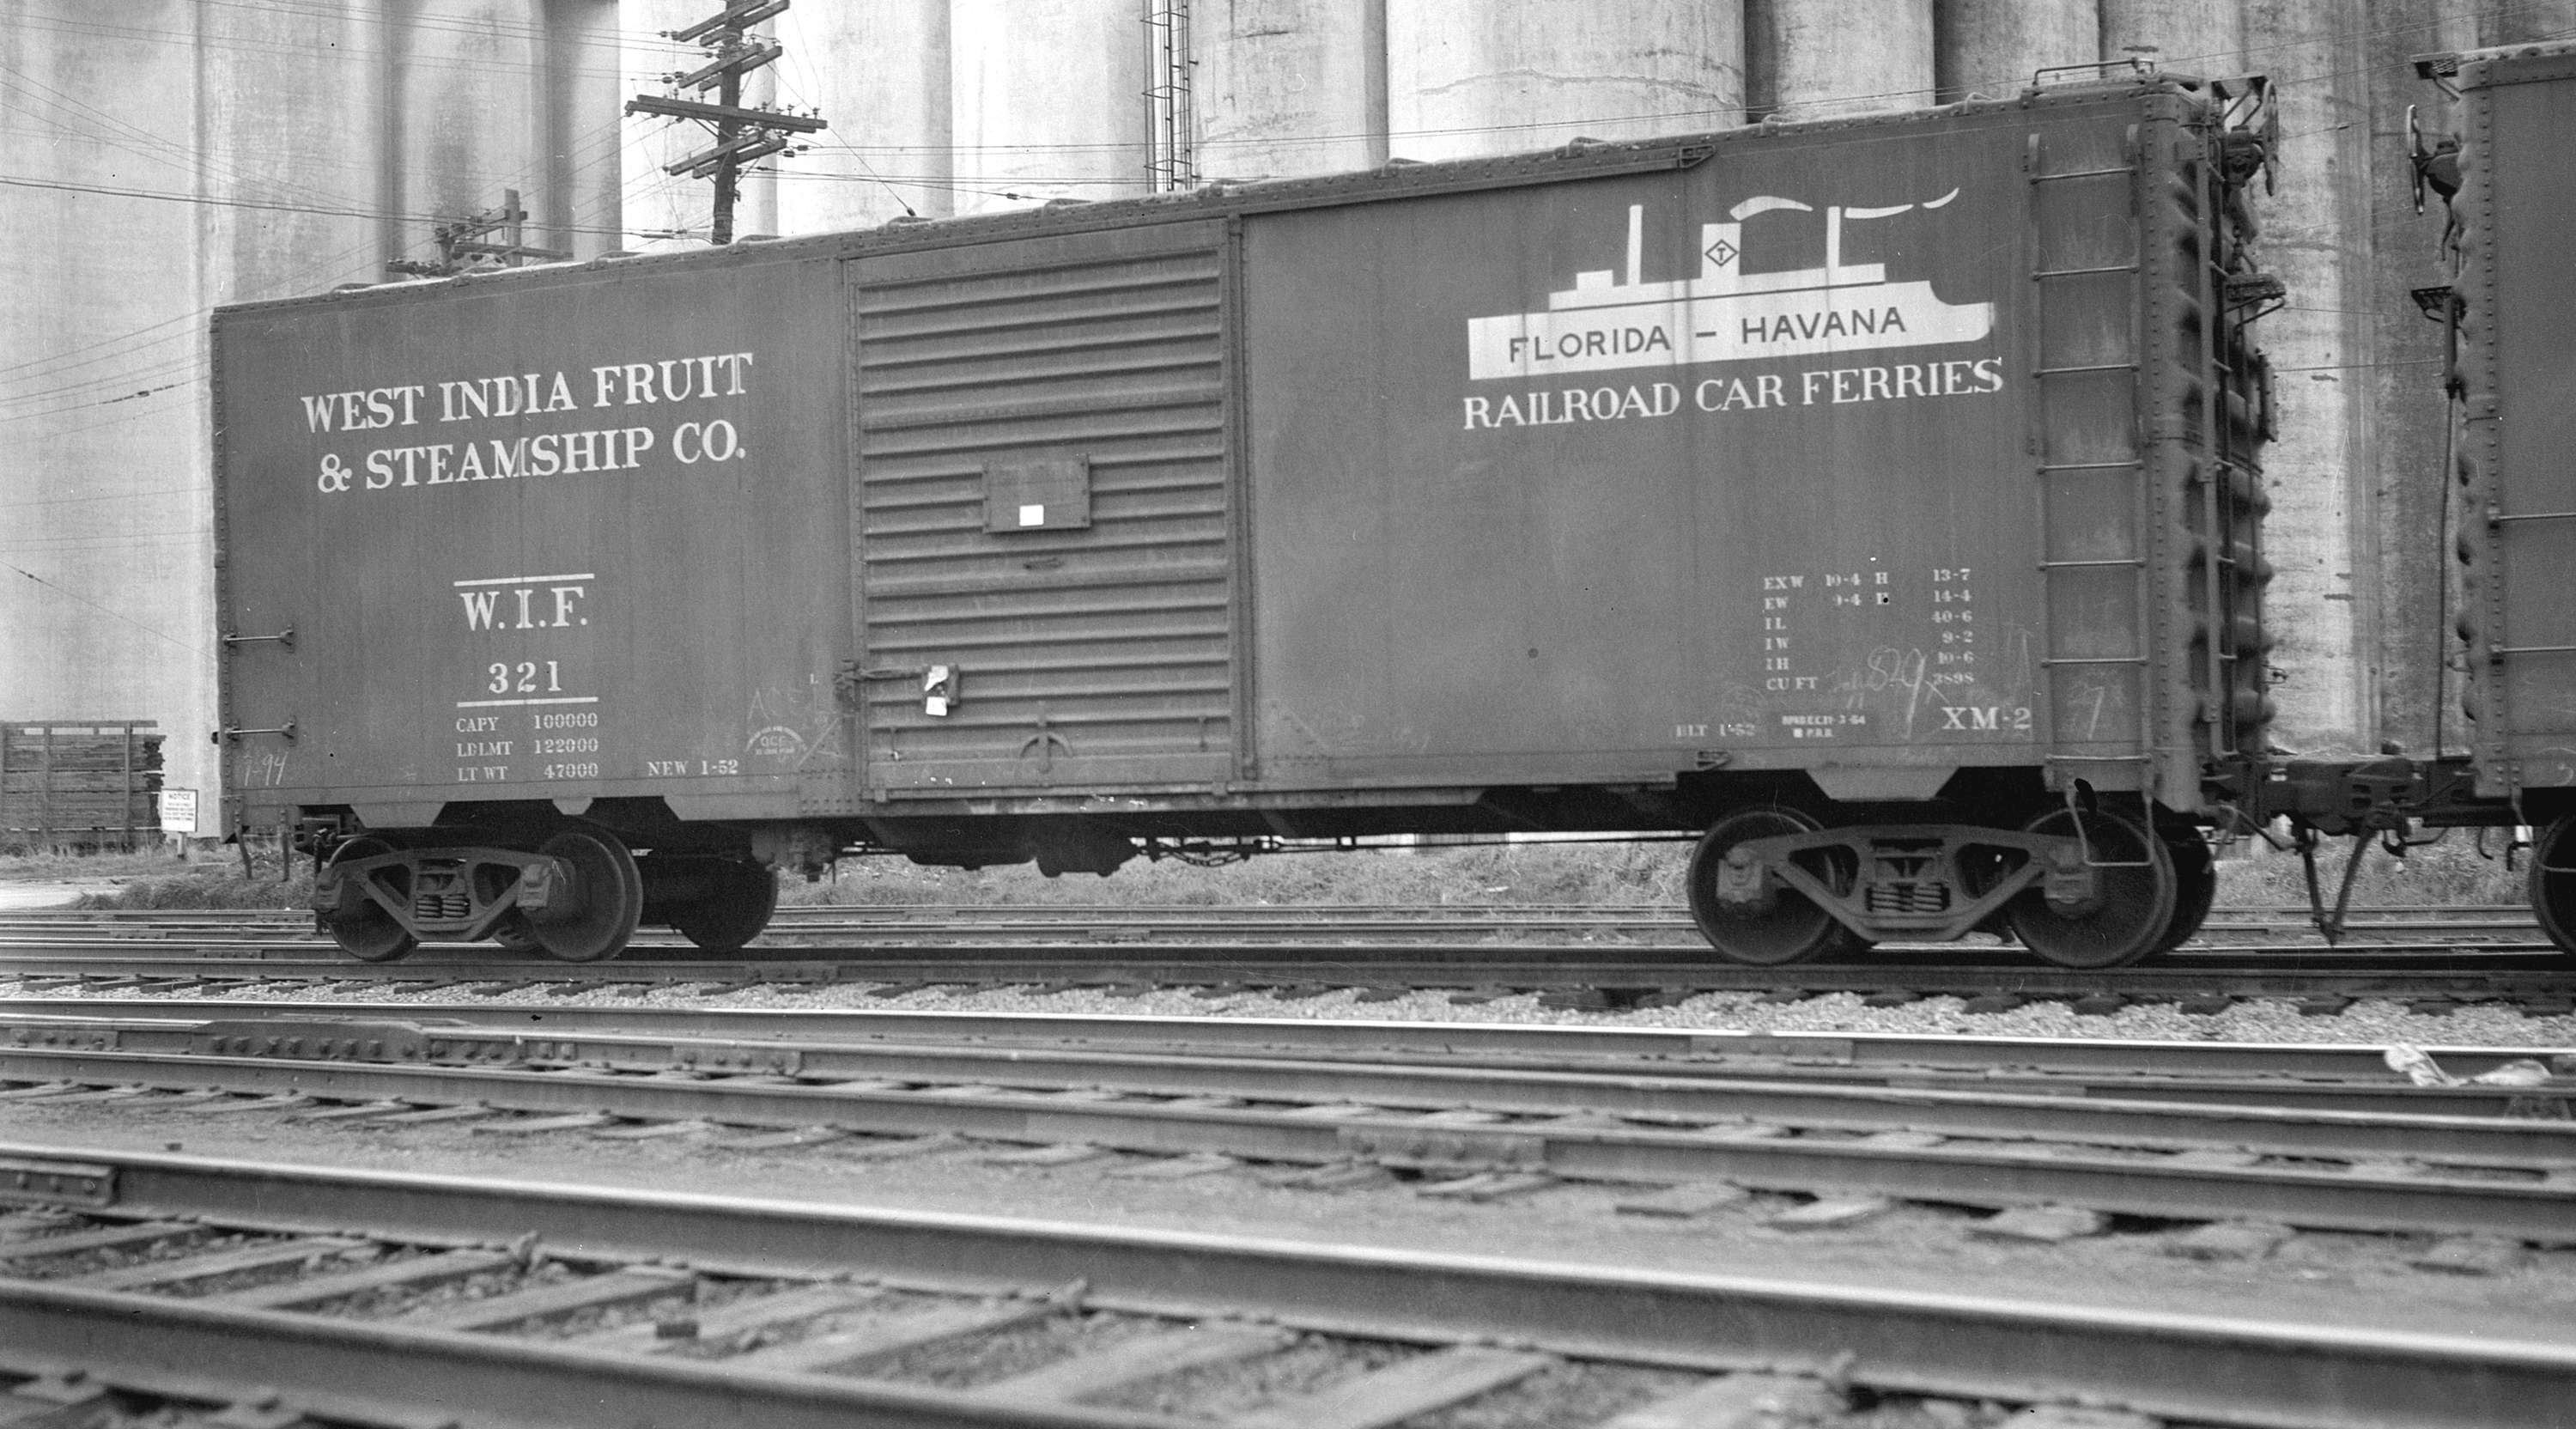
I tend to purchase a car if it represents something notable and a recent buy is just that. I bought an Accurail West India Fruit & Steamship Company boxcar. Seemingly this would be a bit out of place on my Southern California theme layout. But maybe not.


First, a little about the company. The West India Fruit & Steamship Company operated a railcar ferry service between the Port of Palm Beach, Florida, and Havana, Cuba, from 1946 until worsening relations with the Castro government resulted in a trade embargo by the United States in 1960. I model 1956 so no problem. The company had boxcars and refrigerator cars in its fleet.


Upon further research I discovered that the company also ferried freight cars to New Orleans. By the middle 1950s, up to eighty railroad cars each way per day were being transferred between the United States and Cuba. Inbound freight to the U.S. included tobacco, refined sugar, pineapples, rum, tomatoes, slaughterhouse byproducts, and scrap metal. Cuban bound freight included less-than-carload merchandise, manufactured goods, chemicals, lard, railway equipment, temperate zone fruit such as apples, pears, and grapes, meat, dairy, steel products, and machinery.


These cars traveled all over. Here are photos of boxcars WIF 321 and WIF 106 in Vancouver, British Columbia:


And more research determined their freight cars did indeed travel to Southern California. I even found a photograph of one of their cars in Los Angeles at a Southern Pacific yard:


The boxcar (WIF 233) is just behind the two tank cars. Also notice the Canadian Pacific eight-hatch meat reefer (CP 283285) to the right.


So this gave me a reason to purchase the Accurail car. (Accurail no longer produces this car but they are available on E-Bay and elsewhere.) Now all I have to do is figure out some justifiable loads for this car in order to integrate into my operations.

Friday, January 5, 2018

Steve Mahan's Pacific Coast Lines


The February 2018 issue of Model Railroader has major coverage of Steve Mahan's 42 foot by 57 foot HO scale layout in Rancho Cucamonga, CA. The article is by Eric White with photos by Steve Crise.


Steve's layout has never been on one of the Model Railroads of Southern California layout tours. I had Steve scheduled for Tour #9 (February 2008) but he had to withdraw.


I did operate on his layout once and it was a very good experience. Things ran well and there was a good flow to the session. I placed over twenty pictures of scenes which I took in 2008 and 2009 on my Model Railroads of Southern California Groups.io group:


Pictures of citrus modeling scenes appear on my Railroad Citrus Modeling Group Groups.io group here:


This is a beautiful layout so be sure and see it on MR.


Bob Chaparro


Thursday, December 14, 2017

Boxcar Weathering Project


This is another weathering project where I used a tool for the first time.


The project started with an Athearn HO scale Hi-Cube boxcar. After painting the truck frames and wheel faces I sprayed the body with a flat finish. I then applied some Tamiya masking tape over the car initials and numbers. This tape comes in several sizes that are the right sizes for various HO scale car numbers and initials.


The next step was to weather the roof with rust spots. For an applicator I used, for the first time, a piece of an aquarium fish tank sponge filter. The filter came through Amazon and measured 13" x 5" x 1.5". This will produce a lot of applicators.


The technique I used was to paint just a little rust color on the applicator with a brush, being careful not to completely cover the surface of the applicator. I then tested the rust pattern on some white paper. When I was satisfied that there was just the right amount of paint on the applicator I hit the roof randomly, repeating when I needed more "rust".


I painted additional rust along the center of the car roof with a brush and sprinkled on some rust colored weathering powders. The sides of the car were treated with just the applicator. I finished the weathering with several shades of weathering powders applied with a makeup brush.


I am satisfied that the sponge filter applicator is good tool for rendering rust spots and probably will use it many more times. The rust spots could have been streaked if I had immediately gone over them by dragging a brush in a downward motion but I chose not to do that this first time. Maybe next time.


Sunday, November 19, 2017

Another Painting Jig


Here are photos of another painting jig. These are from a video by Ron Marsh of Ron's Trains N Things.


The jig consists of a block of wood and two bamboo skewer segments. The skewers are placed in holes drilled to the same spacing of the bolster screw holes in the model to be painted. The block of wood needs to be fairly wide to provide stability when spaying paint from an airbrush or rattle can. 

Very simple. 

Be careful about where you store this jig as you don't want to accidently puncture your hand if the points are exposed. 

Here is a link to the source video, which is about weathering tank cars: 


Monday, November 13, 2017

Prototype Chalk Markings


As a follow-up to my earlier post on this topic, here are a few prototype examples (Yahoo willing) of chalk markings. Note that these were generated by railroad employees and are not graffiti.


The first markings applied to the sides of railroad equipment were made by railroad employees to communicate among themselves, typically in freight yards. These marks generally weren't applied as a way to say "I was here," but rather to convey important information that other railroad employees needed to know in order to perform their work.


Chalk marks were made using white and yellow chalk, charcoal, and lumber yard  grease pencils. Chalk came in very large sticks, 1" in diameter and 4" long, as compared to normal chalk which was usually 3/8" by 3".  These pieces of chalk were sometimes placed in a holder. The holder itself came from another essential railway tool, the discarded top off a fusee.


Most marking was done by yard clerks or “car markers.” They got their information from waybills. The marks were read by yard crews and freight train conductors. A waybill always accompanied a freight car, but if a car should go astray, or the waybill became lost, often it was possible to locate the car without much delay by the markings on its side.


Markings could communicate a variety of instructions and freight car conditions:


"MT" for empty.

"OK"  or a check mark chalked over a truck to indicate a bearing been inspected

Assigned car spot

Car contents

Condition of equipment that needs repair

Customer information

Destinations

Fragile contents

Humping instructions

Indication of an item's dimensions

Industrial sidings designations

Notations about routings and interchanges

Outgoing train numbers

Perishable instructions

Special handling or loading and unloading instructions

Track assignments

Whether the shipment was all going to several consignees and where it should be opened first


The codes varied from yard to yard and railroad to railroad and likely era to era.  Today many of these would be impossible to decode, so simply copying what you see in prototype photos is probably the best way to model these. Chalking cars mostly died out in the 1980s.


Chalk Markings Experiment


Since I am preparing a clinic on prototype freight car chalk markings (not chalk graffiti) I decided to experiment with various marking tools for making white chalk marks in HO scale.


I used two fine point paint markers and three pencils. Displayed is a picture of:


Sharpie paint marker

Pen-touch paint marker

General charcoal white pencil

Prismacolor Verithin pencil

Supracolor II Soft pencil


 Generally, these are available at Michael's, Aaron Brothers and Dick Blick stores or through their websites.


Displayed is a picture of an HO scale boxcar used for the experiment. The boxcar was given a coat of flat sealer before the marks were applied. The five marking tools were used in the order above, left to right.


 I found the pencils easier to use than the paint markers and they did a better job of simulating chalk marks. The point of the General charcoal white pencil tended to crumble a bit so my recommendations are limited to the Prismacolor Verithin pencil and the Supracolor II Soft pencil.


I previously compared the Prismacolor Verithin pencil to a regular Prismacolor pencil and found the Verithin pencil gave better results so be sure to look for the Verithin version of that pencil brand.


All five of the marks were easily removed within five minutes using isopropyl rubbing alcohol and a cotton swab, so mistakes are easily eliminated.


If you want an alternative to these tools for making chalk marks, decals and dry transfers also can be used. I believe Clover House and Micro-Scale still make chalk marking decals.


I will post samples of prototype chalk markings in the near future.

Saturday, October 21, 2017

Scrap Wheel Load


The article on "Building A Gondola Load Of Wheels" by Bob Kale (See: https://groups.yahoo.com/neo/groups/Model_Railroads_Of_Southern_California/conversations/messages/11431) got me to thinking about doing something similar.


I had a vintage HO scale Revell gondola with a simulated gravel load stuck almost out of sight on the layout. When I say vintage, this car was first produced in 1956 and I bought it new, still in the original box in the early 1970s. Had it been more accessible I probably would have sold it with the other 100-plus older, less detailed freight cars I parted with over the past few months.


So this car was given a second chance at life with a coat of Dullcote, several oil paint washes, more Dullcote, Vallejo rust washes selectively applied, more Dullcote and finally PanPastel colors selectively applied. The truck frames and wheels also were painted/weathered and the journals received Teflon lubricant.


I had a good supply of plastic wheels from converting several hundred freight cars to metal wheels over the past fifty years. These were ok for the bulk of the scrap wheel load but they were generally too thick and lacked a true prototype look. To the rescue came some non-functional Tichy wheels. These are made for the Tichy wheel car (http://www.railroad-line.com/forum/data/desertdrover/2011122615511_WheelCar02.jpg) but the wheels also are sold separately as Part Number 3004.


The wheels received a coat of Krylon Red Oxide Primer followed by painting some of the individual wheels with one or more of the following:


Vallejo Rust Washes

AK Interactive Crusted Rust Deposits (See Photo)

Poly Scale Rust

Tru-Color Rust

Model Master Rust


The simple objective was to not have all the wheels look the same.


I secured the wheels a few at a time to a piece of scrap styrene with Canopy Glue. The better Tichy wheels were distributed along the top row of wheels.


Bob Chaparro

Hemet, CA